• An Open Book: TMSW’s Library
  • Copyright
  • Food for Thought Recipes
  • My Right Eye: A Medical Memoir by Marci Rich
  • Praise and Awards
    • Writing Badges
  • The Midlife Second Wives’ Hall of Fame
  • Who is The Midlife Second Wife?
    • Contact
    • FAQ
  • Read Me On The Huffington Post

The Midlife Second Wife ™

~ The Real and True Adventures of Remarriage at Life's Midpoint

The Midlife Second Wife ™

Tag Archives: Italian cooking

Sicilian Biscotti

26 Monday Aug 2013

Posted by themidlifesecondwife in Food for Thought

≈ 15 Comments

Tags

Baking, Biscotti, Cookies, Italian cooking, Pastries, recipes

Marci Rich, The Midlife Second Wife, biscotti, bakingAbandon all hard, twice-baked, coffeehouse biscotti, ye who enter here. I propose a softer, gentler biscotti—just like my Sicilian grandmother and mother used to bake. Are they a lot of work? Sì, sì. Are they worth it? Assolutamente! These delicious cookies, unfrosted, freeze beautifully, so you can prepare them in advance. When you’re ready to serve them, thaw them and frost them the day before you’re ready to serve. Or frost them the day you bake them, as soon as they’ve cooled. Or don’t frost them at all. I guarantee you’ll love them. (And if you enjoy them with coffee, remember: it’s all right to dunk.)

Oh, and by the way…bloggers from The Midlife Boulevard are sharing their favorite recipes. Click where it says “Click here” to find out what’s cooking!

Powered by Linky Tools

Click here to enter your link and view this Linky Tools list…

SICILIAN BISCOTTI

—Makes approximately 14 dozen cookies

Two sticks unsalted butter, softened
Six eggs
Two-and-a-half cups sugar
One-and-a-half cups milk
Three tablespoons baking powder
One teaspoon vanilla*
Eight cups unsifted flour (more might be needed)

*Some people prefer anise flavoring, or even lemon. I’m not one of those people.

STEP ONE: Cream sugar and shortening in a stand mixer using the paddle attachment. Add eggs, one at a time, beating after each addition.

Marci Rich, The Midlife Second Wife, biscotti

Here’s how the dough should look after all six eggs have been incorporated into the batter.

STEP TWO: Combine vanilla and milk. Add baking powder to five cups of the flour. Add some of the vanilla/milk, and alternate with some of the enhanced flour. Beat after each addition and continue to alternate liquid with dry ingredients until the five cups of enhanced flour have been used up.

Marci Rich, The Midlife Second Wife, biscotti

Here’s how the dough should look after the vanilla/milk mixture and five cups of flour (with baking powder incorporated) have been added.

STEP THREE: Add remaining three cups of flour a small amount at a time, beating after each addition and scraping down the sides of the bowl. At this point we begin to bake the way my grandmother did; she spoke very little English, and never wrote out her recipes—my mother was her scribe. You will absolutely have to add more flour—I can’t really say how much, because, like my grandmother, at this point I work by instinct. Just know that you’ll know you’ve hit the sweet spot when you pull apart a small amount of dough and it begins to hold shape and no longer feels sticky. You’ll also find, shortly before reaching this point, that the mixer has given you its all and it’s time to add the additional flour by hand, stirring well. At this stage you’ll want to use either a heavy spoon, or what I like to call a culinary carpet beater. If you’ve ever read my recipe for spätzle, you’ll recognize this utensil.

Marci Rich, The Midlife Second Wife, biscotti

Time to switch out the mixer and use some elbow grease, along with either a heavy spoon or a utensil like the one depicted here. I also find it helpful to transfer the dough into a larger bowl.

STEP FOUR: You deserve a break after using the carpet beater. You’ll also have used your hands to knead the dough. Note that I’ve transferred the dough to a larger bowl for easier handling. Top the dough closely with wax paper so that no air gets to it, Put plastic wrap over the entire bowl, and refrigerate it while you grab some lunch or a cup of coffee.

Marci Rich, The Midlife Second Wife, biscotti

Here’s what the finished dough should look like. It’s now ready for a brief sojourn in the refrigerator while you put your feet up.

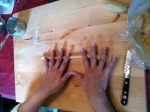
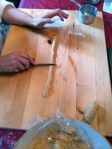
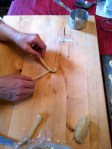
STEP FIVE: Remove the dough from the refrigerator and prepare your work area. I like to use a large cutting board at my dining room table. (I’m careful to spread a heavy-duty vinyl table cloth on it first.) You’ll also need extra flour to dust the board, plenty of greased cookie sheets, and a knife for cutting the dough.

Roll the dough, by hand, into desired shapes—I like to make braided wreaths, straight braids, S-shapes, and coils. This photo gallery will show you the process for making a braided wreath.


Place the shaped biscotti on greased cookie sheets, and bake at 400-degrees for 10 to 12 minutes, or until they are very lightly browned on top. Do not overbake. Once they have cooled, they are ready for frosting.

BUTTERCREAM FROSTING

—Makes enough frosting for about 10 dozen biscotti

Marci Rich, The Midlife Second Wife, biscotti, bakingOne stick unsalted butter, softened
One teaspoon vanilla extract
One pound Confectioner’s sugar (no need to sift)
Three to four tablespoons milk

Using the whisk attachment of a stand mixer, cream butter with extract. Gradually add Confectioner’s sugar, beating thoroughly after each addition. Stir in milk and beat until frosting is of spreading consistency.

I find it helpful to prepare my workspace ahead of time, spreading my trusty tablecloth on the dining table, using freezer paper as a way station for the unfrosted biscotti and a finishing room for the ones I’ve already frosted. You’ll want to let the frosted cookies sit out in the air for several hours so the icing hardens up and makes it easier to transfer them to either a serving platter or a Tupperware storage container, using waxed paper to line the layers of cookies. Once frosted, these should keep for about a week if kept in an airtight container. No need to refrigerate them.

One final note: if you find yourself intimidated by the amount of work these take, do what I do and make them once or twice a year only during holiday seasons. I recently made a large batch for my future daughter-in-law’s bridal shower, and shaped a few longer braids into hearts.

Marci Rich, The Midlife Second Wife, biscotti, baking

Share this:

  • Click to share on Facebook (Opens in new window)
  • Click to share on Twitter (Opens in new window)
  • Click to share on Pinterest (Opens in new window)
  • Click to share on LinkedIn (Opens in new window)
  • Click to email a link to a friend (Opens in new window)
  • Click to print (Opens in new window)
  • Click to share on Tumblr (Opens in new window)
  • Click to share on Pocket (Opens in new window)
  • Click to share on Reddit (Opens in new window)

Like this:

Like Loading...

Linguine Alla Pastora: A Scissor-Worthy Recipe

13 Friday Jul 2012

Posted by themidlifesecondwife in Food for Thought

≈ 8 Comments

Tags

Cooking, Food, Italian cooking, Pasta, recipes

Here’s an oldie but oh-so goodie—so much so that the card upon which I glued the clipping, stained to near illegibility, is dog-eared from close to 30 years of handling. If memory serves, this recipe, which I’ve adapted over time, originated in the (Cleveland) Plain Dealer, and was part of an article featuring different ways to prepare a variety of pastas. As so often happens when I discover a new recipe, I become so enamored of it that the thought of leaving it—even for a momentary dalliance with a thematic variation—never enters my mind. That’s the case with linguine alla pastora. I’m sure I’m missing out on the chance to enhance my repertoire, and I tell myself I’ll retire this from my rotation when I grow bored with it, but that hasn’t happened yet. Probably never will.

What makes this recipe so attractive to me? Well, it’s a great summertime pasta dish, when farmers’ markets are brimming with the fresh vegetables it requires. Also, it’s  quite easy and enjoyable to make. I love the aromas that fill the kitchen when I saute the ingredients for this meal. And, truth be told, I’m a sucker for compliments. This comes as a shock, I know. But seriously, every time I’ve served this dish, whether for family or friends, it gets raves. Positive reinforcement is a powerful thing.

The only step in this recipe that might give you pause is the call for roasted red peppers. Oh sure, you can buy them in a jar at your local specialty market, but why would you when they’re so easy to prepare? I’ll explain how to roast red peppers at the end of this post. For now, join me as I walk you through one of my favorite pasta dishes, the rustic Linguine alla Pastora, or, if you will, the Shepherdess’ Linguine.

Linguine alla Pastora
—4 to 6 servings

1 pound imported linguine pasta
1/4 cup olive oil
1 onion, sliced in small arcs
2 cloves garlic, minced
2 zucchini, sliced
1/4 pound pancetta (Italian bacon), cut into lardons*
1/2 cup dry white wine
1-3 tablespoons chopped fresh Italian parsley
2 red peppers, roasted and sliced**
1/8 teaspoon crushed red pepper
1/2 teaspoon freshly ground black pepper
1/4 (at least) cup grated Parmigiano-Reggiano cheese

You would do well to roast the red peppers first so they have a chance to cool while you’re preparing the rest of the ingredients. Instructions can be found at the end of this post.

Bring a large pot of salted water to boil.

While the water is coming to the boil. heat olive oil in a 12-inch saute-pan. Add onion, garlic, zucchini, and pancetta, and cook at medium heat for five minutes, or until onion is transparent.

Add pasta to the boiling water and cook until al dente.While the pasta is cooking, add wine to the sauteed vegetables and reduce at high heat for five minutes. Lower heat to medium, and add parsley and red pepper slices. Season with peppers and cook five minutes longer.

When the pasta is cooked to your liking, drain and reserve.

When the saute is ready, place about half of the cooked pasta in a large serving bowl and toss with about half of the saute. Add the remainder of the pasta and saute and toss well. Top with grated Parmigiano-Reggiano cheese (I believe there’s no such thing as too much Parmigiano-Reggiano) and serve.

*If you cannot find pancetta, you may substitute prosciutto. I’ve also made this with fresh sauteed sea scallops, omitting the Italian meat entirely.

**How to Roast Red Peppers

After washing the peppers, dry them and place them on a rack under the broiler element of your oven. (Don’t place them directly on the removable rack that comes with your oven; use something similar to what is shown in the photograph and place that on the removable rack. Also, I place the oven rack fairly close to the heating element.) What follows is very important and can’t be over-emphasized: keep an eye on the peppers while you are roasting them. Don’t leave the kitchen to tend to something else. You want to be nearby to (carefully) turn them with tongs as they begin to char so they are nicely roasted on all sides. The entire procedure should not take more than ten minutes, depending upon the size of the peppers and how close to the heat you’ve placed them.

After removing the roasted peppers from the oven, very carefully wrap each one in a paper towel. They will be hot to handle, so you might want to wait a moment or two until you can comfortably perform this step.

Place each wrapped pepper in a small plastic bag and set aside while you tend to other aspects of your recipe. So cossetted, they will steam nicely, making it much easier for you to remove their skins.

After about 15 minutes or so, rouse the peppers from their little sleeping bags. I run them under cold water to a) make them easier to handle, since they’re still quite warm, and b) begin rubbing and pulling at the charred skin to peel it off. Using your fingers, pull the skin away from the peppers, then remove the stem and seeds. (A vegetable peeler won’t work.) After the peppers are limp, empty shells of what they used to be, slice them into strips. That’s it. You’re done!

Share this:

  • Click to share on Facebook (Opens in new window)
  • Click to share on Twitter (Opens in new window)
  • Click to share on Pinterest (Opens in new window)
  • Click to share on LinkedIn (Opens in new window)
  • Click to email a link to a friend (Opens in new window)
  • Click to print (Opens in new window)
  • Click to share on Tumblr (Opens in new window)
  • Click to share on Pocket (Opens in new window)
  • Click to share on Reddit (Opens in new window)

Like this:

Like Loading...

Lasagna Casserole with Meat and Red Wine Sauce

22 Thursday Mar 2012

Posted by themidlifesecondwife in Food for Thought

≈ 2 Comments

Tags

Cooking, Food, Italian cooking, Lasagna, Pasta, recipes

As someone who prides herself not only on her culinary skills but also on her Sicilian heritage, I’m embarrassed to admit to you that it took me years to finally get around to making lasagna. For one thing, my mother never made it. I don’t remember my grandmother doing so, either. That said, there was no time-honored recipe for me to inherit. And I’m enough of a cooking snob that I didn’t want to bother with the recipe on the back of the box of dried lasagna (or was it the intimidation factor?). All of this goes by way of saying that I waited not until I enjoyed this most fundamental recipe of Italian cuisine at someone’s home, but until I found a recipe that sounded to me as though it would reward all of my time and trouble by yielding a meal that could go down in the annals of cooking history as the greatest of all time.

Reader, I found it.

Trust me when I tell you that this lasagna is magnificent. Although it might appear complicated on a first-read, it really just requires some advance preparation and organization—and what recipe doesn’t? Plus, it doesn’t require a béchamel sauce, so that’s one step you can cross off your to-do list. This is fun to make, it will fill your home with mouth-watering aromatics, and it is so delicious as to qualify as a mortal sin. When I served this for company recently, one impressed guest remarked: “Well, I used to make lasagna. I won’t anymore. Not after this.”

This really will spoil you for any other lasagna recipe.

It comes from a terrific anthology cookbook called From Our House to Yours: Comfort Food to Give and Share, published by Chronicle Books. It’s a book for a good cause, too; sales benefit Meals on Wheels of San Francisco. I found it at a winery in Napa about 10 years ago, and everything I’ve ever made from it has been fabulous. Now, a word about the recipe itself. Foodwriter, chef, and culinary educator Julia della Croce is its creator. Julia is one of America’s foremost authorities on Italian food, and has published numerous books; you can find a list of her titles on her website. (The one containing this recipe is The Pasta Book.) Julia also writes a blog—wonderfully named—called “Forktales.” She graciously gave me permission to include her lasagna recipe on this blog. Julia, grazie mille!

Lasagna Casserole with Meat and Red Wine Sauce

—Serves 6

1/2 ounce dried porcini mushrooms
3 tablespoons olive oil
3 tablespoons unsalted butter
1 medium to large onion, finely chopped
1 large garlic clove, finely chopped
3 tablespoons chopped fresh flat-leaf parsley leaves
1 large carrot, peeled and finely chopped
1 large stalk celery, including leaves, finely chopped
1/2 pound lean, sweet, fennel-flavored Italian pork sausages (about 3 links)
1 pound lean ground beef or pork
4 tablespoons tomato paste
3/4 cup good dry red wine
One 28-ounce can tomatoes in puree, drained and coarsely chopped, puree reserved
1-1/2 teaspoons salt, or to taste, plus 2 tablespoons for cooking pasta (I use Kosher salt for the recipe, and regular Iodized salt for cooking the pasta)
Freshly ground pepper to taste
2 tablespoons vegetable oil
1 pound dried lasagna or narrower lasagnette noodles
3 cups (24 ounces) ricotta cheese
Good pinch of freshly grated nutmeg
1-1/2 cups freshly grated Parmesan cheese (I use Parmigiano Reggiano)
1/2 pound thinly sliced Italian salame such as soppressata, diced
1-1/2 pounds good-quality mozzarella cut into very thin slices, or shredded (shredding goes faster)

1. Soak the dried mushrooms in 1/4 cup warm water until softened, about 30 minutes. Strain the liquid through a fine sieve and reserve. Chop the mushrooms coarsely. Set aside.

2. Heat the olive oil and butter in a heavy saucepan. Add the onion, garlic, parsley, carrot, and celery. Sauté over medium heat until the vegetables are softened, about 10 minutes; do not let them brown. Remove the sausage meat from the casings. Add it and the ground meat to the pan. Sauté until lightly browned, about 8 minutes, breaking up the meat with a spoon and mixing it with the vegetables. Sauté gently another 8 to 10 minutes. Stir in the reserved mushrooms and their liquor, the tomato paste, and wine; simmer for 5 minutes. Add the tomatoes and their reserved puree; simmer gently, uncovered, until the sauce thickens, about 30 minutes. Season with salt and pepper.

3. Meanwhile, preheat the oven to 425°F. Place an oven rack in the upper half of the oven. Bring 5 to 6 quarts water to a rolling boil and add the 2 tablespoons salt, vegetable oil, and noodles. Stir immediately, continuing to stir frequently as the noodles cook. Drain when slightly underdone (they will continue to cook in the oven), reserving 1/3 cup of the cooking water. Immediately rinse the lasagne noodles well in cold water to prevent them from sticking together.

4. Combine the ricotta with the reserved pasta water, nutmeg, and 1/2 cup of the Parmesan cheese. Smear the bottom of a 10-by-14-inch baking pan with a little of the meat sauce. Then place a single solid layer of the noodles on top, without overlapping. Spread a layer of the ricotta mixture on the noodles, followed by a layer of sauce. Sprinkle with some of the salame, add a layer of mozzarella, then sprinkle with several teaspoons of the remaining Parmesan cheese. Repeat layering until all the ingredients are used up, ending with a layer of meat sauce strewn with mozzarella and Parmesan. Be sure to cover the pasta with sauce to prevent it from drying out in the oven.

5. Bake until the lasagne is heated through and bubbly, about 25 minutes. Remove from the oven and let settle for 10 to 15 minutes. Cut into squares before serving.

TO MAKE AHEAD: The lasagne can be assembled up to 4 days in advance. Once cooked, it will keep, covered, in the refrigerator for up to 5 days, or freeze for up to 6 months.

TO REHEAT: If frozen, let thaw in the refrigerator. Reheat in a preheated 350°F oven until heated through.

Share this:

  • Click to share on Facebook (Opens in new window)
  • Click to share on Twitter (Opens in new window)
  • Click to share on Pinterest (Opens in new window)
  • Click to share on LinkedIn (Opens in new window)
  • Click to email a link to a friend (Opens in new window)
  • Click to print (Opens in new window)
  • Click to share on Tumblr (Opens in new window)
  • Click to share on Pocket (Opens in new window)
  • Click to share on Reddit (Opens in new window)

Like this:

Like Loading...

Chicken Parmesan

07 Wednesday Mar 2012

Posted by themidlifesecondwife in Food for Thought

≈ 7 Comments

Tags

chicken, Cooking, Food, Italian cooking, recipes

There’s no meal quite so satisfying as Chicken Parmesan, which I prepared last Sunday with linguini aglio olio (linguini in a sauce of garlic and olive oil) and roasted asparagus. The Fresh Market had a sale on chicken breasts—$1.99 per pound—and I planned our dinner around that bargain. There’s also nothing quite so satisfying as knowing you’ve spent less than $15 on ingredients that will yield three meals (if you’re cooking for two and love leftovers). You should also get two to three lunches from the breaded cutlets that didn’t fit into the baking pan. That, my investment-savvy friends, is a fantastic ROI.)

If you’ve got the basics in your pantry—extra-virgin olive oil, garlic, Italian-seasoned bread crumbs, Parmesan cheese plus good Parmigiano-Regianno, pasta, red pepper flakes, and canned tomato sauce—you shouldn’t have to buy much else other than chicken, provolone, your vegetable, and flat-leaf Italian parsley (for jazzing up your pasta). Two whole chicken breasts (or four halves, depending on how you tend to size things up) formed the foundation for this dinner. I started the day before by preparing my breaded chicken cutlets; all I needed to do to serve it the day was assemble and cook the recipe, make my pasta with garlic and olive oil, and roast the asparagus. A crusty baguette and a bottle of wine rounded out the meal. Delizioso!

CHICKEN PARMESAN

—Serves six, with extra breaded cutlets to make sandwiches for three lunches

For the breaded cutlets:
2 whole boneless chicken breasts
3 to 6 Tablespoons olive oil
2 to 3 cups seasoned Italian bread crumbs
1 to 2 cups grated Parmesan cheese
Salt and freshly ground pepper
4 eggs, beaten with a whisk
1/2 half shallot, minced

Slice the breasts down the middle, then slice off the side end of each half-breast so that each piece lays flat on your cutting board. With a meat mallet, gently pound each piece of chicken until the pieces are about one-half inch thick. Season the chicken with salt and pepper.

Whisk the eggs and add the minced shallot. Blend the bread crumbs and cheese together on a baking sheet.

Dip each piece of chicken in the eggs, then dredge in the crumb and cheese mixture. Place each breaded chicken piece on a separate baking sheet and continue until all of the chicken has been breaded.

Heat 3 tablespoons of olive oil in a large skillet over medium-high heat. Add the cutlets and cook until they are golden brown, about 2 to 3 minutes per side. Add extra oil to the skillet as needed. You’ll likely have to cook the cutlets in batches; after each cutlet is cooked, remove it to a tray or plate lined with paper towels.

When finished, you can either cover the cutlets with aluminum foil and store until the next day, or continue with the recipe.

For the Parmesan:
3 16-ounce cans good quality tomato sauce
7 to 8 breaded chicken cutlets
7 to 8 slices Provolone cheese
1/2 cup freshly grated Parmigiano-Regianno cheese

Preheat the oven to 475-degrees F. Spread some of the tomato sauce on the bottom of a 9 x 13 baking pan, then arrange the breaded chicken cutlets on top, adding more sauce in between each cutlet. Top each cutlet with a slice of Provolone cheese, then add a dollop of sauce to the cheese. Sprinkle the Parmigiano-Regianno over all.

Bake until the cheese melts and the chicken is cooked through, about 10 minutes or until nice and bubbly. Serve immediately.

(You will find, to your delight, that you should have unused breaded cutlets, which will be wonderful the next day for lunch, served on crusty Italian bread.)

(Would you like the recipe for the Linguini Aglio Olio? I can arrange that!)

Share this:

  • Click to share on Facebook (Opens in new window)
  • Click to share on Twitter (Opens in new window)
  • Click to share on Pinterest (Opens in new window)
  • Click to share on LinkedIn (Opens in new window)
  • Click to email a link to a friend (Opens in new window)
  • Click to print (Opens in new window)
  • Click to share on Tumblr (Opens in new window)
  • Click to share on Pocket (Opens in new window)
  • Click to share on Reddit (Opens in new window)

Like this:

Like Loading...

The Godmother’s Italian Wedding Soup

20 Monday Feb 2012

Posted by themidlifesecondwife in Food for Thought, Nostalgia, Relationships and Family Life

≈ 4 Comments

Tags

Cooking, Food, Italian cooking, Italian Wedding Soup, recipes, Soups

I was not at a wedding the first time I ever tasted Italian Wedding Soup. My recollection is surprisingly sharp, given I could not have been more than eight-years old. My mother, who was of Sicilian descent, had cousins in Warren, Michigan. My father drove the three of us up from Elyria, Ohio—a nearly three-hour trip—for a day visit, the purpose of which eludes me (here my memory is as dense as a cumulonimbus cloud). We gathered for a delicious dinner in the cousins’ formal dining room. I suspect there are two reasons why I remember any of this at all: First, we never traveled anywhere as a family, and second, I had never seen soup with what looked like cooked lettuce in it. It wasn’t lettuce at all, of course, but rather escarole. (I had no idea what that was, so the distinction was lost on me at the time.) All I knew was that the concoction was wonderful, punctuated by the most charming little meatballs I’d ever seen outside of a plate of spaghetti. This sense memory has stayed with me for years.

The name comes from the Italian word for soup, minestra, and the fact that the flavors “marry” well (maritata); hence, wedding soup. This recipe comes from my godmother Fannie, an excellent cook. You’ll remember meeting her in my story “Marlo & Me—Act I.” Aunt Fannie, thank you for sharing this recipe with me, and for allowing me to include it in the blog.

ITALIAN WEDDING SOUP
Serves 4

FOR THE MEATBALLS:
2 pounds ground chuck or round steak
3/4 cup Italian-seasoned bread crumbs
3 eggs, whipped with a whisk
1 Tablespoon parsley flakes
1/4 cup freshly grated Parmigiano-Reggiano cheese
1-1/2 teaspoons Kosher salt
1/2 teaspoon freshly ground pepper
1 teaspoon garlic powder, or 1 minced clove of garlic
2-3 Tablespoons olive oil, for frying

Mix all of the ingredients thoroughly in a large bowl. Cover and let stand at room temperature for one and one-half hours.

Roll the meat into 1/2-inch balls. Brown in olive oil and drain on paper towels. (At this point the meatballs can be frozen for later use.)

THE SOUP:
One-half batch browned meatballs for 2 quarts broth. Freeze the rest of the meatballs for the next time. (If you wish to use the entire batch of meatballs, double the following quantities):

1 bunch escarole (fresh spinach can be substituted)
2 quarts chicken stock (I had homemade stock in my freezer)
Two eggs, beaten
1 cup freshly grated Parmigiano-Reggiano cheese
Kosher salt and freshly ground black pepper, to taste

Wash, trim, and cut the escarole (or spinach) into small pieces. Place in a pot of boiling water for about eight minutes (five minutes if using spinach). Drain well.

Bring chicken broth to a boil, season with salt and pepper to taste, and reduce heat to simmer. Add the meatballs and escarole (or spinach) and return to a boil. Reduce heat, cover, and simmer for about 20 minutes, allowing the flavors of the meatballs to infuse the broth. Add the beaten eggs and cheese. Serve immediately, with extra cheese at the table.

Share this:

  • Click to share on Facebook (Opens in new window)
  • Click to share on Twitter (Opens in new window)
  • Click to share on Pinterest (Opens in new window)
  • Click to share on LinkedIn (Opens in new window)
  • Click to email a link to a friend (Opens in new window)
  • Click to print (Opens in new window)
  • Click to share on Tumblr (Opens in new window)
  • Click to share on Pocket (Opens in new window)
  • Click to share on Reddit (Opens in new window)

Like this:

Like Loading...

A Musical Postscript to Grandma Monia’s Breaded Eggplant

22 Saturday Oct 2011

Posted by themidlifesecondwife in Food for Thought, The Musical Life

≈ Leave a comment

Tags

Breading, Cooking, Eggplant, Food, Italian cooking, Michael Franks, Olive oil, Recipe, recipes

Happy Saturday, everyone! I typically try not to work on the weekend, but I just had to share this with you. It’s a cozy day at home, and John is puttering around listening to his favorite Pandora station—Kenny Rankin. He came up to have me listen to a song by Michael Franks. “This is your song,” he said. When I heard it, I knew I had to add it to the post with Grandma Monia’s recipe for breaded eggplant. The name of the song is—say it along with me—”Eggplant.” According to JRFMRadio’s posting on YouTube, this was recorded live at La Cigale in Paris on October 7, 2010. And since I’ve been wanting to add a department for the arts, I herewith inaugurate “The Musical Life” section of the blog with this entry. Enjoy!

Serves 4, with ample leftovers. Kept in a tightly sealed plastic container or on a plate covered tightly with plastic wrap, these should keep for about a week refrigerated.

One medium-size eggplant
Salt
Four eggs
Seasoned Italian bread crumbs
Parmesan cheese
Good olive oil

A word before you begin: It’s always a good idea to read through a recipe a couple of times before you launch into things. That said, please don’t let the length of this recipe scare you away—it’s an easy dish to prepare! I tried to be as detailed as I could  because for this dish, it’s all about preparation and process. Have all of your ingredients at hand and ready before you start, and give yourself ample time for working on this, because once you begin frying the eggplant you really need to remain at the stove until you’re finished. But trust me: the reward will be delicious!

Fill a pot with cold, salted water and set aside. (I find the plastic tub from my salad spinner is perfect for this.)

With a vegetable peeler, remove the skin from the eggplant. Using a sharp knife, trim off the ends. Using the same knife or a mandoline slicer, carefully slice the eggplant into large discs, approximately ¼ -inch thick, placing each slice immediately into the waiting tub of salted water.

Let the eggplant slices soak for about ten minutes. Drain the water and rinse the eggplant slices with cold water, then refill the tub with cold salted water and repeat the soaking process.

(Why go to all of this bother? Because you’ll notice the water from the first rinse, and even the second, will be a yucky brown. The salted water is drawing the bitterness out of the eggplant. Trust me.

Drain and rinse well, then pat the slices dry with paper towels.

Whisk the eggs in a bowl large enough to hold several eggplant slices.

Now set up your preparation area:

Using a breading pan, place about two cups of breadcrumbs and one cup Parmesan cheese in one of its sections; mix well with a fork. (If you don’t have a breading pan, use two baking sheets with sides—I use two old pizza pans. Don’t do anything with the other section or the second baking sheet or pizza pan yet; you will use it to hold the breaded slices.

Line a third baking sheet with paper towels. Set aside. (You’ll use this to drain the fried eggplant.)

Place the sliced eggplant, three to four slices at a time, in the egg wash and making sure to coat each side thoroughly.

Then, one at a time, place an egg-washed slice of eggplant in the crumb-and-cheese mixture, pressing firmly enough to ensure a good, even coat of crumbs on each side. Set the breaded eggplant slice on the extra pan you have set aside. Continue this process until all of the slices have been breaded.

Over medium heat, warm a large sauté pan for about 30 seconds, then add enough good quality olive oil to coat the bottom of the pan. Increase the heat to medium-high. Once the oil is hot, place several eggplant slices in the pan, taking care not to crowd them. Brown for about five minutes or until the bottoms are golden brown, then turn them over and brown the other side. When the first batch is complete, remove from the pan and drain on the large, paper-towel-lined pan you had set aside. Then place a layer of paper towels on top of the fried eggplant slices, ready to receive the next fried batch. (You’ll end up with paper towels between each layer of eggplant.)

Complete this process until all of the eggplant has been fried. Note that after about two fryings, you’ll need to carefully drain the hot oil from the pan and replenish it with fresh oil, repeating this process as needed. (An empty coffee can works great for this.) You don’t want the oil to get black and smoky; this will burn the eggplant and ruin the taste. What you are looking for is nicely golden-brown slices.

Serve warm, or prepare ahead and refrigerate. These are delicious cold; I’ve never tried to reheat them. You can eat them plain. (I dare you to have enough left over to serve guests!) Although I’ve never felt the urge to reheat them, John suggests doing so and serving them with a warm marinara dipping sauce.)

Incidentally, this is also a great first-step in making Eggplant Parmesan—something that I’ve never attempted, for some inexplicable reason. As someone who is half-Sicilian and thinks her Italian cooking skills are pretty sharp, I’m embarrassed to admit this to you. Now I’ll have to hunt for a good recipe. If you have a great recipe for Eggplant Parmesan that you’d like to share, please post it in the comment section following this recipe!

Share this:

  • Click to share on Facebook (Opens in new window)
  • Click to share on Twitter (Opens in new window)
  • Click to share on Pinterest (Opens in new window)
  • Click to share on LinkedIn (Opens in new window)
  • Click to email a link to a friend (Opens in new window)
  • Click to print (Opens in new window)
  • Click to share on Tumblr (Opens in new window)
  • Click to share on Pocket (Opens in new window)
  • Click to share on Reddit (Opens in new window)

Like this:

Like Loading...

Peppery Pasta Parmigiano

12 Wednesday Oct 2011

Posted by themidlifesecondwife in Food for Thought

≈ Leave a comment

Tags

Food, Italian cooking, Olive oil, Parmigiano-Reggiano, Pasta, recipes

John and I love spending lazy Saturday mornings at the South-of-the-James, our favorite local Farmers’ Market. One recent, early-autumn day, we saw these beautiful peppers. I couldn’t resist photographing them, and of course I wondered how I might prepare them. I asked the vendor if they were sweet peppers or hot.

“Oh, they’re very mild,” she said. “I like to pop them right in my mouth.”

With that disclaimer in hand, John and I circled back to Cavanna’s, a fresh, handmade pasta stand, where we bought tagliolini, a sort of secondo cugino to fettuccine. We also picked up a zucchini, and—back in our neighborhood—bought some sweet Italian sausage to give the dish some heft.

Reader, if by writing this blog I can impart one lesson and one lesson only, let it be this: Whenever a farm vendor tells you that a pepper is mild, question it. Doubt it with every fiber of your being. Bring all of your skepticism to bear and, above all, never ever roast a pan of them in a hot oven and breathe in the fumes when you open the door. That said, use—at most—one-half of two of the smallest peppers for your dish. And only after removing their seeds. You must trust me on this. As for the remainder, give them to your husband’s colleague from India, who is as passionate about spontaneously combustible spices as mares are to oats or lambs are to ivy.

The recipe I concocted ended up being incredibly delicious. And, not counting the inhalation of hot-pepper fumes, no husbands or wives were injured during the preparation of this dish.
MiseEnPlace for Peppery Pasta_0743CAREFUL! Roasted Hot Peppers_0745The Sauté_0746Peppery Pasta Parmigiano_0748

Peppery Pasta Parmigiano, a set on Flickr.

Gallery of images for Peppery Pasta Parmigiano Recipe

Peppery Pasta Parmigiano

Makes four to six servings

1 pound of fresh tagliolini pasta
1/4 cup of good olive oil, divided
1 onion, finely chopped
2-3 cloves garlic, minced
1 zucchini, peeled and sliced thin
1/2 pound sweet Italian sausage, casing removed and sausage crumbled
1/2 cup dry white wine
2 tablespoons fresh Italian parsley, chopped
1-2 small, colorful peppers (refer to above disclaimer), seeds removed,
cut in half, and then cut in ribbons. Use one-half of each pepper.
1/8 teaspoon crushed red pepper flakes
1 teaspoon Kosher salt
1/2 teaspoon freshly ground black pepper
1/2 cup grated Parmigiano-Reggiano cheese

Bring a large pot of salted water to boil.

Heat 1/8-cup olive oil in a sauté pan and brown the sausage until it is done and no longer pink. Set aside. In a second sauté pan, heat remaining olive oil and add onion, garlic, zucchini, and the browned sausage. Cook at medium heat for five minutes, or until onion is transparent.

Add wine and reduce at high heat for five minutes. Lower heat to medium, and add parsley and peppers. Season with pepper flakes, salt, and pepper and cook for five minutes.

With the pot of salted water at a roiling boil, add the fresh pasta. Take care to cook according to the package directions, noting that fresh pasta typically only takes two to three minutes to cook.

Drain the cooked pasta and rinse with cold water. Place about half in a large serving bowl and toss with the pepper/sausage concoction. Add remaining pasta and continue to toss. Top with cheese and serve.

Share this:

  • Click to share on Facebook (Opens in new window)
  • Click to share on Twitter (Opens in new window)
  • Click to share on Pinterest (Opens in new window)
  • Click to share on LinkedIn (Opens in new window)
  • Click to email a link to a friend (Opens in new window)
  • Click to print (Opens in new window)
  • Click to share on Tumblr (Opens in new window)
  • Click to share on Pocket (Opens in new window)
  • Click to share on Reddit (Opens in new window)

Like this:

Like Loading...

Grandma Monia’s Breaded Eggplant

14 Wednesday Sep 2011

Posted by themidlifesecondwife in Food for Thought

≈ 4 Comments

Tags

Breading, Cooking, Eggplant, Food, Italian cooking, Olive oil, Recipe

Serves 4, with ample leftovers. Kept in a tightly sealed plastic container or on a plate covered tightly with plastic wrap, these should keep for about a week refrigerated.

One medium-size eggplant
Salt
Four eggs
Seasoned Italian bread crumbs
Parmesan cheese
Good olive oil

A word before you begin: It’s always a good idea to read through a recipe a couple of times before you launch into things. That said, please don’t let the length of this recipe scare you away—it’s an easy dish to prepare! I tried to be as detailed as I could  because for this dish, it’s all about preparation and process. Have all of your ingredients at hand and ready before you start, and give yourself ample time for working on this, because once you begin frying the eggplant you really need to remain at the stove until you’re finished. But trust me: the reward will be delicious!

Fill a pot with cold, salted water and set aside. (I find the plastic tub from my salad spinner is perfect for this.)

With a vegetable peeler, remove the skin from the eggplant. Using a sharp knife, trim off the ends. Using the same knife or a mandoline slicer, carefully slice the eggplant into large discs, approximately ¼ -inch thick, placing each slice immediately into the waiting tub of salted water.

Let the eggplant slices soak for about ten minutes. Drain the water and rinse the eggplant slices with cold water, then refill the tub with cold salted water and repeat the soaking process.

(Why go to all of this bother? Because you’ll notice the water from the first rinse, and even the second, will be a yucky brown. The salted water is drawing the bitterness out of the eggplant. Trust me.

Drain and rinse well, then pat the slices dry with paper towels.

Whisk the eggs in a bowl large enough to hold several eggplant slices.

Now set up your preparation area:

Using a breading pan, place about two cups of breadcrumbs and one cup Parmesan cheese in one of its sections; mix well with a fork. (If you don’t have a breading pan, use two baking sheets with sides—I use two old pizza pans. Don’t do anything with the other section or the second baking sheet or pizza pan yet; you will use it to hold the breaded slices.

Line a third baking sheet with paper towels. Set aside. (You’ll use this to drain the fried eggplant.)

Place the sliced eggplant, three to four slices at a time, in the egg wash and making sure to coat each side thoroughly.

Then, one at a time, place an egg-washed slice of eggplant in the crumb-and-cheese mixture, pressing firmly enough to ensure a good, even coat of crumbs on each side. Set the breaded eggplant slice on the extra pan you have set aside. Continue this process until all of the slices have been breaded.

Over medium heat, warm a large sauté pan for about 30 seconds, then add enough good quality olive oil to coat the bottom of the pan. Increase the heat to medium-high. Once the oil is hot, place several eggplant slices in the pan, taking care not to crowd them. Brown for about five minutes or until the bottoms are golden brown, then turn them over and brown the other side. When the first batch is complete, remove from the pan and drain on the large, paper-towel-lined pan you had set aside. Then place a layer of paper towels on top of the fried eggplant slices, ready to receive the next fried batch. (You’ll end up with paper towels between each layer of eggplant.)

Complete this process until all of the eggplant has been fried. Note that after about two fryings, you’ll need to carefully drain the hot oil from the pan and replenish it with fresh oil, repeating this process as needed. (An empty coffee can works great for this.) You don’t want the oil to get black and smoky; this will burn the eggplant and ruin the taste. What you are looking for is nicely golden-brown slices.

Serve warm, or prepare ahead and refrigerate. These are delicious cold; I’ve never tried to reheat them. You can eat them plain. (I dare you to have enough left over to serve guests!) Although I’ve never felt the urge to reheat them, John suggests doing so and serving them with a warm marinara dipping sauce.)

Incidentally, this is also a great first-step in making Eggplant Parmesan—something that I’ve never attempted, for some inexplicable reason. As someone who is half-Sicilian and thinks her Italian cooking skills are pretty sharp, I’m embarrassed to admit this to you. Now I’ll have to hunt for a good recipe. If you have a great recipe for Eggplant Parmesan that you’d like to share, please post it in the comment section following this recipe!

Share this:

  • Click to share on Facebook (Opens in new window)
  • Click to share on Twitter (Opens in new window)
  • Click to share on Pinterest (Opens in new window)
  • Click to share on LinkedIn (Opens in new window)
  • Click to email a link to a friend (Opens in new window)
  • Click to print (Opens in new window)
  • Click to share on Tumblr (Opens in new window)
  • Click to share on Pocket (Opens in new window)
  • Click to share on Reddit (Opens in new window)

Like this:

Like Loading...

Twitter Updates

  • Hi there! I changed names; please follow me @marcirichwriter instead. 5 years ago
Follow @midlife2wife

Company

  • 167,683 Guests since 8/24/11

Receive notifications of new posts by email.

Join 2,938 other subscribers

Topics

  • Current Events
  • Food for Thought
  • Giveaways
  • House and Garden
  • Humor Me
  • Indulgences
  • Inspiring Women
  • LifeStyles
  • Love
  • Midpoints
  • Monday Morning Q & A
  • Money Matters
  • Nostalgia
  • Portraits of the Artist
  • Product Reviews
  • Relationships and Family Life
  • Remarriage
  • Second Weddings
  • Second Wife Hall of Fame
  • Secrets to a Happy Relationship
  • Special Events
  • Technology
  • The Beautiful Life
  • The Cultured Life
  • The Healthy Life
  • The Life Poetic
  • The Musical Life
  • The Reading Life
  • The Well-Dressed Life
  • The Writing Life
  • Transitions
  • Travel
  • Well-Dressed
  • What's the Buzz?

RSS Feeds

  • RSS - Posts
  • RSS - Comments

Archives

  • July 2019 (1)
  • December 2014 (1)
  • November 2014 (1)
  • October 2014 (2)
  • August 2014 (1)
  • June 2014 (2)
  • May 2014 (2)
  • April 2014 (3)
  • March 2014 (3)
  • February 2014 (3)
  • January 2014 (4)
  • December 2013 (9)
  • November 2013 (2)
  • October 2013 (3)
  • September 2013 (6)
  • August 2013 (5)
  • July 2013 (6)
  • June 2013 (2)
  • May 2013 (3)
  • April 2013 (1)
  • March 2013 (1)
  • January 2013 (3)
  • December 2012 (7)
  • November 2012 (7)
  • October 2012 (12)
  • September 2012 (9)
  • August 2012 (6)
  • July 2012 (4)
  • June 2012 (5)
  • May 2012 (4)
  • April 2012 (1)
  • March 2012 (10)
  • February 2012 (8)
  • January 2012 (9)
  • December 2011 (10)
  • November 2011 (30)
  • October 2011 (18)
  • September 2011 (12)
  • August 2011 (2)

Networks

NetworkedBlogs
Blog:
The Midlife Second Wife ™
Topics:
Relationships, Life, After 50
 
Follow my blog

bloglovin

The Blogs of Others

  • A Baby Boomer Woman's Life After 50
  • A.B. Westrick
  • An Empowered Spirit
  • Apart from my Art
  • Author Meg Medina
  • Better After 50
  • Books is Wonderful
  • Darryle Pollack: I Never Signed Up For This
  • Diana Patient: Photography
  • Empty House, Full Mind
  • GenerationBSquared
  • Grandma's Briefs
  • Grown and Flown
  • Midlife at the Oasis
  • Midlife Boulevard
  • Midlife Mixtape
  • Reason Creek
  • Relocation: The Blog
  • Romancing Reality
  • Second Lives Club
  • The Boomer Rants
  • WHOA Network
  • WordCount

Blog at WordPress.com.

  • Follow Following
    • The Midlife Second Wife ™
    • Join 448 other followers
    • Already have a WordPress.com account? Log in now.
    • The Midlife Second Wife ™
    • Customize
    • Follow Following
    • Sign up
    • Log in
    • Report this content
    • View site in Reader
    • Manage subscriptions
    • Collapse this bar
 

Loading Comments...
 

    %d bloggers like this: